

Tenable & ServiceNow Integration with Endpoint Privilege Management Using Vulnerability Scores
Description of Integration:
The integration described in this guide uses webhooks and API requests to allow users to approve EPM BeyondTrust application access request tickets in ServiceNow using CVE scores and severity ratings from Tenable, which eliminates manual intervention and delays, helping organizations improve their overall security posture.
Disclaimer
This integration is an example of a working prototype and will not be supported by BeyondTrust. Any sample or proof of concept code (“Code”) provided on the Community is provided “as is” and without any express or implied warranties. This means that we do not promise that it will work for your specific needs or that it is error-free. Such Code is community supported and not officially supported by BeyondTrust. BeyondTrust and its contributors are not liable for any damage you or others might experience from using the Code, including but not limited to, loss of data, loss of profits, or any interruptions to your business, no matter what the cause is, even if advised of the possibility of such damage.
The required permissions in the BeyondTrust Product to be able to configure the integration:
Access to a Privilege Management tenant is required and an account with the Administrator role.
The required permissions/access level in ServiceNow to be able to configure the integration:
- An active BeyondTrust Privilege Management (EPM) API account
- The API account will require Full Access to the Command API.
- OAuth Provider (BeyondTrust EPM OAuth) in the ServiceNow Application Registry configured with your Endpoint Privilege Management settings:
- Client ID and Secret of your Endpoint Privilege Management (EPM) Access API account
- For the token URL, add your Endpoint Privilege Management (EPM) instance
- ServiceNow instance with Flow Designer and Security Incident Response application enabled.
- Tenable API credential alias named Tenable_api already configured in ServiceNow (Connection & Credential Aliases). This requires you to create your connection and add your API Key Credentials using the credentials generated by Tenable.
Setting Up a Webhook in ServiceNow to Receive BeyondTrust Ticket Details:
- Purchase of BeyondTrust EPM Integration App from the ServiceNow App Store
- Add EPM as OAuth Client in ServiceNow
Create a Webhook in EPM - Privilege Management Console:
You will create webhooks for each event type you want to integrate with ServiceNow.
Webhook URL
The webhook URL for all webhooks will follow this pattern:
https://YOUR-INSTANCE.service-now.com/api/x_bets_pmc_jit/authorization_request_webhook_handler
Replace YOUR-INSTANCE with your actual ServiceNow instance subdomain.
Example: https://acme.service-now.com/api/x_bets_pmc_jit/authorization_request_webhook_handler
Create webhooks
- Navigate to: EPM → Configuration → Webhook Settings
- Click Create Webhook
Webhook 1: JIT Admin Ticket Created
Configure the first webhook with the following settings:
- Name: ServiceNow - Admin Access - Create
- URL: https://YOUR-INSTANCE.service-now.com/api/x_bets_pmc_jit/authorization_request_webhook_handler
- Event: JIT Admin Ticket Created
- Content Type: application/json
- Template: Use the template below
- Authentication Type: Basic
- Authentication Username: pmc_webhook_user (or the username you created)
- Authentication Password: The password you set for the webhook user
- Enable Webhook: Check to enable
Template for JIT Admin Ticket Created:
JSON
{
  "EventType": "JIT_ADMIN_TICKET_CREATED",
  "RequestId": "%%RequestId%%",
  "TenantId": "%%TenantId%%",
  "Timestamp": "%%Timestamp%%",
  "ComputerId": "%%ComputerId%%",
  "GroupId": "%%GroupId%%",
  "TicketNumber": "%%TicketNumber%%",
  "Reason": "%%Reason%%",
  "UserId": "%%UserId%%",
  "UserName": "%%UserName%%",
  "DurationRequested": "%%DurationRequested%%"
}
Click Save.
Webhook 2: JIT Admin Decision Updated
Create a second webhook with the following settings:
- Name: ServiceNow - Admin Access - Update
- URL: https://YOUR-INSTANCE.service-now.com/api/x_bets_pmc_jit/authorization_request_webhook_handler
- Event: JIT Admin Decision Updated
- Content Type: application/json
- Template: Use the template below
- Authentication Type: Basic
- Authentication Username: pmc_webhook_user
- Authentication Password: The password you set for the webhook user
- Enable Webhook: Check to enable
Template for JIT Admin Decision Updated:
JSON
{
  "EventType": "JIT_ADMIN_TICKET_UPDATED",
  "RequestId": "%%RequestId%%",
  "TicketNumber": "%%TicketNumber%%",
  "TenantId": "%%TenantId%%",
  "StartTime": "%%StartTime%%",
  "EndTime": "%%EndTime%%",
  "Decision": "%%Decision%%",
  "DecisionTime": "%%DecisionTime%%",
  "DecisionPerformedByUser": "%%DecisionPerformedByUser%%",
  "Duration": "%%Duration%%",
  "DurationRequested": "%%DurationRequested%%",
  "Timestamp": "%%Timestamp%%"
}
Click Save.
Webhook 3: JIT Application Access Ticket Created
Create a third webhook with the following settings:
- Name: ServiceNow - App Access - Create
- URL: https://YOUR-INSTANCE.service-now.com/api/x_bets_pmc_jit/authorization_request_webhook_handler
- Event: JIT Application Access Ticket Created
- Content Type: application/json
- Template: Use the template below
- Authentication Type: Basic
- Authentication Username: pmc_webhook_user
- Authentication Password: The password you set for the webhook user
- Enable Webhook: Check to enable
Template for JIT Application Access Ticket Created:
JSON
{
  "EventType": "URM_Native_Ticket_Created",
  "RequestId": "%%RequestId%%",
  "TenantId": "%%TenantId%%",
  "Timestamp": "%%Timestamp%%",
  "TicketNumber": "%%TicketNumber%%",
  "requestInfo": {
    "applicationType": "%%ApplicationType%%",
    "action": "%%Action%%",
    "workstyle": "%%Workstyle%%",
    "reason": "%%Reason%%",
    "user": "%%User%%",
    "hostName": "%%HostName%%",
    "trustedOwnership": "%%trustedOwnership%%",
    "productDescription": "%%ProductDescription%%",
    "driveType": "%%DriveType%%",
    "btZoneIdentifierExists": "%%BtZoneIdentifierExists%%",
    "productCode": "%%ProductCode%%",
    "upgradeCode": "%%UpgradeCode%%",
    "clsId": "%%ClsId%%",
    "comDisplayName": "%%ComDisplayName%%",
    "token": "%%Token%%",
    "tokenAssignmentIsShell": "%%TokenAssignmentIsShell%%",
    "uacTriggered": "%%UacTriggered%%",
    "downloadSourceUrl": "%%DownloadSourceUrl%%",
    "userLanguage": "%%UserLanguage%%",
    "sha1Hash": "%%Sha1Hash%%",
    "sha256Hash": "%%Sha256Hash%%",
    "filePathObjectId": "%%FilePathObjectId%%",
    "cmdArgs": "%%CmdArgs%%",
    "publisher": "%%Publisher%%",
    "productName": "%%ProductName%%",
    "productVersion": "%%ProductVersion%%",
    "fileVersion": "%%FileVersion%%",
    "workstyle": "%%Workstyle%%",
    "applicationGroup": "%%ApplicationGroup%%",
    "message": "%%Message%%",
    "messageId": "%%MessageId%%",
    "hostType": "%%HostType%%",
    "osName": "%%OsName%%",
    "osVersion": "%%OsVersion%%",
    "ComputerGroup": "%%ComputerGroup%%",
    "GroupId": "%%GroupId%%",
    "requestVersion": "%%RequestVersion%%",
    "hostedFilePath": "%%HostedFilePath%%",
    "parentProcess": "%%ParentProcess%%",
    "storeAppName": "%%StoreAppName%%",
    "serviceName": "%%ServiceName%%",
    "serviceAction": "%%ServiceAction%%",
    "authRequestUri": "%%AuthRequestUri%%",
    "bundleInfoDescription": "%%BundleInfoDescription%%",
    "reputationScoreDateTime": "%%ReputationScoreDateTime%%",
    "reputationScore": "%%ReputationScore%%",
    "reputationIntegrationType": "%%ReputationIntegrationType%%"
  }
}
Click Save.
Webhook 4: JIT Application Access Decision Updated
Create a fourth webhook with the following settings:
- Name: ServiceNow - App Access - Update
- URL: https://YOUR-INSTANCE.service-now.com/api/x_bets_pmc_jit/authorization_request_webhook_handler
- Event: JIT Application Access Decision Updated
- Content Type: application/json
- Template: Use the template below
- Authentication Type: Basic
- Authentication Username: pmc_webhook_user
- Authentication Password: The password you set for the webhook user
- Enable Webhook: Check to enable
Template for JIT Application Access Decision Updated:
JSON
{
  "EventType": "URM_NATIVE_DECISION_UPDATE",
  "RequestId": "%%RequestId%%",
  "TenantId": "%%TenantId%%",
  "TicketNumber": "%%TicketNumber%%",
  "Timestamp": "%%Timestamp%%",
  "requestInfo": {
    "Decision": "%%Decision%%",
    "DecisionTime": "%%DecisionTime%%",
    "DecisionPerformedByUser": "%%DecisionPerformedByUser%%",
    "Duration": "%%Duration%%"
  }
}
Click Save.
How to test and troubleshoot the integration:
- To test and invoke the webhook, perform the following instructions:
- Click “Send Sample Event” and you should see a message “Sample event sent successfully”
Create the Actions and Flow in ServiceNow
Part 1: Create Action — "Get Tenable Vulnerabilities and Scores"
1.1 Create the Action
Step 1: In Tenable, navigate to Flow Designer.
Step 2: Click New > Action.

Step 3: Set the following properties:
| Action Name | Get Tenable Vulnerabilities and Scores |
| Application | Security Incident Response |
| Description | Calls Tenable Workbench Vulnerabilities API and returns CVE findings count, max severity, max VPR score, Plugin Name, and max CVSS score for the application in the incident description. |
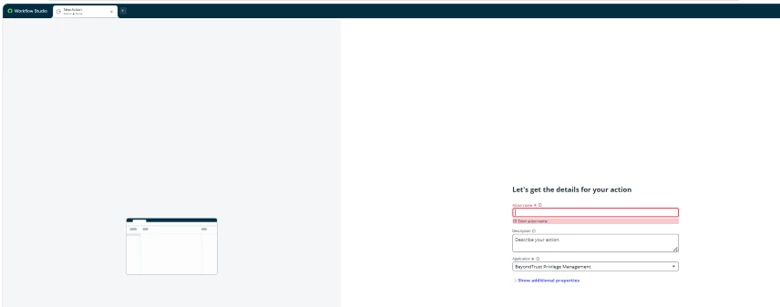
Step 4: Click Submit to create the action.
1.2 Define Action Inputs
Step 1: In the Action Outline (left panel), click Inputs.
Step 2: Click Create Variable and add the following input:
| Label | Incident Description |
| Name | incident_description |
| Type | String |
| Mandatory | No |

1.3 Add Step 1 — REST Step (Spotlight API Call)
Step 1: Click the + icon in the Action Outline to add a new step.
Step 2: Search for and select REST.
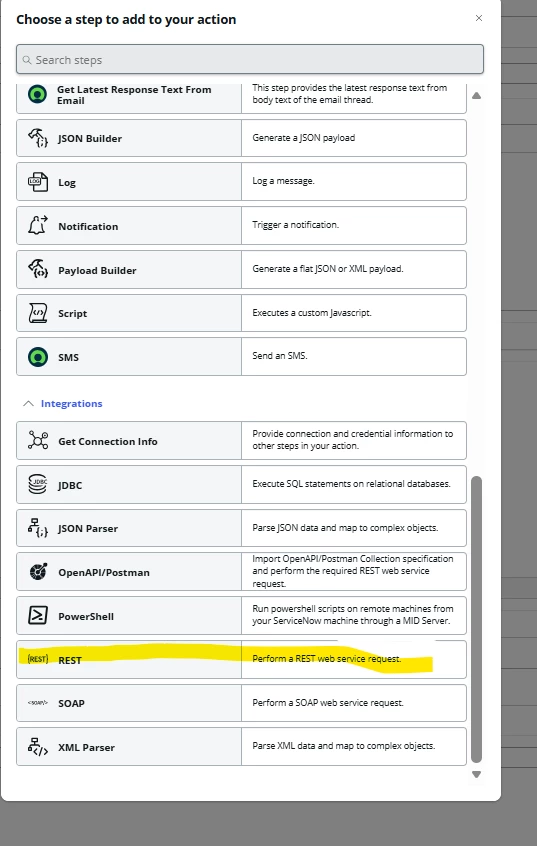
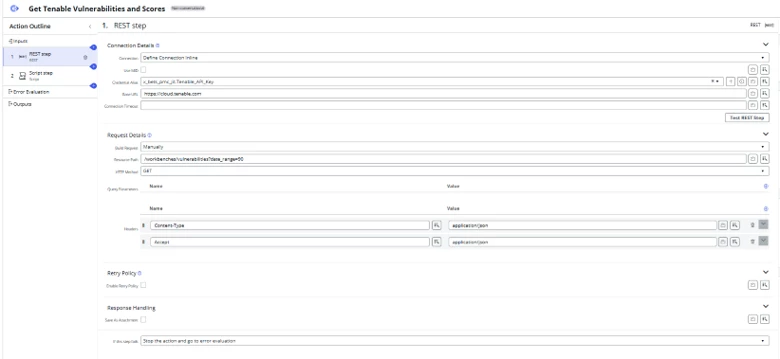
Step 3: Configure the REST step as follows:
| Connection | Define Connection Inline |
| Credential Alias | Tenable_api |
| Base URL | https://cloud.tenable.com |
| HTTP Method | GET |
| Resource Path | /workbenches/vulnerabilities?date_range=90 |
| Request Body | (leave empty) |
Step 4: Under Headers, add:
| Content-Type | application/json |
| Accept | application/json |
Step 5: Save the step. The step will output Response Body, Status Code, and Error Code.
1.4 Add Step 2 — Script Step (Parse and Match CVEs)
Step 1: Click the + icon to add another step.
Step 2: Search for and select Script.
Step 3: Set Required Runtime to Instance.
Configure Input Variables for the Script Step
In the Input Variables section of the script step, create two variables:
| Name | Value (pill mapping) |
| incident_description | Action Input > Incident Description |
| response_body | Step 1 (REST step) > Response Body |
Note: The variable name in this table (left column) is the name you type in the Name field. The right column is what you drag/select from the Data panel on the right side of the screen. The variable name must exactly match what the script uses in inputs.incident_description and inputs.response_body.

Configure Output Variables for the Script Step
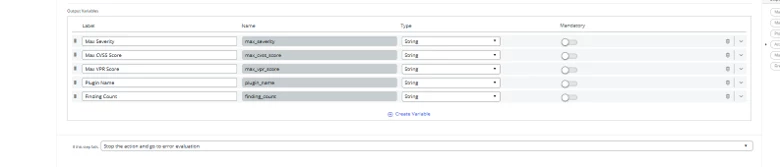
In the Output Variables section at the bottom of the script step, create three variables:
| Label | Name | |
| Finding Count | finding_count | |
| Max CVSS Score | max_cvss_score | |
| Max Severity | max_severity | |
| Max VPR Score | max_vpr_score | |
| Plugin Name | plugin_name | |
| Label | Name | Type |
| Finding Count | finding_count | String |
| Max CVSS Score | max_cvss_score | String |
| Max Severity | max_severity | String |
| Max VPR Score | max_vpr_score | String |
| Plugin Name | plugin_name | String |
Enter the Script
Paste the following script into the Script field:
(function execute(inputs, outputs) {


    function setOut(sev, cvss, vpr, plugin, count) {

        outputs.max_severity   = sev;

        outputs.max_cvss_score = cvss;

        outputs.max_vpr_score  = vpr;

        outputs.plugin_name    = plugin;

        outputs.finding_count  = count;

    }


    var body = JSON.parse(inputs.response_body);

    if (!body || !body.vulnerabilities) { setOut('API error','','','','0'); return; }

    var all = body.vulnerabilities;


    // 1. Application path -> search terms (handles spaces in the path)

    var p = (inputs.incident_description || '')

            .match(/[a-zA-Z]:\\[^\r\n]*?\.(?:exe|dll|msi|msp|bat|cmd|com|ps1|vbs|scr|jar)\b/i);


    if (!p) { setOut('no path in description','0','0','','0'); return; }


    var full   = p[0].toLowerCase().replace(/\//g, '\\');

    var parts  = full.split('\\');

    var file   = parts.pop().replace(/\.[^.]+$/, '');   // notepad++.exe -> notepad++

    var folder = parts.pop() || '';                     // notepad++


    // generic folders tell us nothing about the product

    var GENERIC = ['windows','system32','syswow64','winsxs','temp','tmp','bin','downloads'];

    if (GENERIC.indexOf(folder) >= 0) folder = '';


    function strip(s) {

        return String(s).replace(/^(ms|msft)/, '').replace(/[^a-z0-9]/g, '');

    }


    var exact = [], loose = [];

    [file, folder].forEach(function (b) {

        if (!b || b.length < 3) return;

        if (exact.indexOf(b) < 0) exact.push(b);          // notepad++

        var s = strip(b);

        if (s.length >= 3 && loose.indexOf(s) < 0) loose.push(s);   // notepad

    });


    if (!exact.length) { setOut('no usable term','0','0','','0'); return; }


    // 2. Match on plugin name only - exact terms first, then relaxed

    function findMatches(terms) {

        var out = [];

        for (var i = 0; i < all.length; i++) {

            var name = String(all[i].plugin_name || '').toLowerCase();

            for (var t = 0; t < terms.length; t++) {

                if (name.indexOf(terms[t]) >= 0) { out.push(all[i]); break; }

            }

        }

        return out;

    }


    var matched = findMatches(exact);

    if (!matched.length) matched = findMatches(loose);

    if (!matched.length) { setOut('not found','0','0','','0'); return; }


    // 3. Summarise

    var LABEL = ['INFO','LOW','MEDIUM','HIGH','CRITICAL'];

    var maxCvss = 0, maxVpr = 0, maxSevIdx = -1, topPlugin = '';


    for (var k = 0; k < matched.length; k++) {

        var m = matched[k];


        var cvss = (m.cvss3_base_score != null) ? m.cvss3_base_score

                 : (m.cvss_base_score  != null) ? m.cvss_base_score : 0;

        cvss = parseFloat(cvss) || 0;

        if (cvss > maxCvss) { maxCvss = cvss; topPlugin = m.plugin_name || ''; }


        var vpr = parseFloat(m.vpr_score) || 0;

        if (vpr > maxVpr) maxVpr = vpr;


        var sev = (typeof m.severity === 'number') ? m.severity : -1;

        if (sev > maxSevIdx) maxSevIdx = sev;

    }


    setOut(LABEL[maxSevIdx] || 'INFO', String(maxCvss), String(maxVpr),

           topPlugin, String(matched.length));

})(inputs, outputs);
How the Script Works
- Regex pulls the application path out of the description, matching from a drive letter through to a known executable extension — that's what lets it handle spaces like c:\program files\notepad++\.
- Splits the path into filename (notepad++) and parent folder (notepad++), dropping the extension.
- Blocklists generic folders (windows, system32, temp…) so a path's location doesn't get mistaken for a product name.
- Builds two tiers of terms: exact keeps the name as-is (notepad++), loose strips punctuation and vendor prefixes (notepad, msedge → edge).
- Scans every plugin's plugin_name for any exact term first and matching on plugin_name only.
Step 4: Click Save.
Step 5: Click Publish to make the action available in flows.
Part 2: Create Action — "Add Tenable CVSS Scores and CVE Score to Incident Work Notes"
2.1 Create the Action
Step 1: In Flow Designer, click New > Action.
Step 2: Set the following properties:
| Action Name | Add Tenable CVSS Scores and CVE Score to Incident Work Notes |
| Application | Security Incident Response |
| Description | Writes Tenable CVE findings (count, severity, CVSS score, and VPR Score) to the incident work notes. |
Step 3: Click Submit.
2.2 Define Action Inputs
Step 1: Click Inputs in the Action Outline.
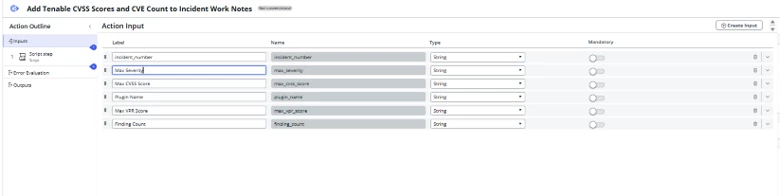
Step 2: Create four input variables:
| Label | Name | Type |
| Incident Number | incident_number | String |
| Finding Count | finding_count | String |
| Max CVSS Score | max_cvss_score | String |
| Max Severity | max_severity | String |
| Max VPR Score | max_vpr_score | String |
| Plugin Name | plugin_name | String |
2.3 Add Step 1 — Script Step
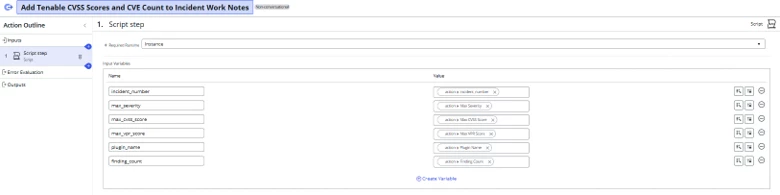
Step 1: Click + to add a step and select Script.
Step 2: Set Required Runtime to Instance.
Configure Input Variables
Add the following input variables, mapping each to the corresponding action input:
| incident_number | Action Input > Incident Number |
| finding_count | Action Input > Finding Count |
| max_severity | Action Input > Max Severity |
| max_cvss_score | Action Input > Max CVSS Score |
| max_vpr_score | Action Input > Max VPR Score |
| plugin_name | Action Input > Plugin Name |
Note: This action has no output variables — it only writes to the incident and does not return values.
Enter the Script:
(function execute(inputs, outputs) {


    if (!inputs.incident_number) { return; }


    var gr = new GlideRecord('incident');

    gr.addQuery('number', inputs.incident_number);

    gr.query();

    if (!gr.next()) { return; }


    var sev = String(inputs.max_severity || '').toLowerCase();

    var noMatch = (sev === 'not found' || sev === 'api error' ||

                   sev === 'no usable term' || sev.indexOf('no path') === 0);


    var note;


    if (noMatch) {

        note = 'Tenable Vulnerability Report\n\n' +

               'No matching Tenable findings for the requested application.\n' +

               'Reason: ' + (inputs.max_severity || 'unknown');

    } else {

        function line(label, value) {

            value = (value === null || value === undefined) ? '' : String(value).trim();

            return value ? (label + ': ' + value + '\n') : '';

        }


        note = 'Tenable Vulnerability Report\n\n' +

               line('Highest Severity',   inputs.max_severity)   +

               line('Highest CVSS Score', inputs.max_cvss_score) +

               line('Highest VPR Score',  inputs.max_vpr_score)  +

               line('Findings Matched',   inputs.finding_count)  +

               line('CVEs Matched',       inputs.cve_count)      +

               line('Top Finding',        inputs.plugin_name);

    }


    gr.work_notes = note;

    gr.update();

})(inputs, outputs);
Step 3: Click Save, then Publish.
Part 3: Create a New Flow — "Deny EPM JIT App Request Based on Tenable Scores"
This section walks through building the full flow from scratch. The flow triggers when a BeyondTrust EPM JIT incident is created, retrieves CVE data from Tenable Spotlight, writes the findings to work notes, and — if the severity is HIGH or CRITICAL — automatically denies the EPM application and admin requests for the compromised user.
Completed flow structure:
| Step | Action |
| Trigger | Incident Created where Short description contains "BeyondTrust EPM JIT" |
| 1 | Get Tenable Vulnerabilities and Scores |
| 2 | Add Tenable CVSS Scores and CVE Count to Incident Work Notes |
| 3 | If — Risk Score Criteria (Max Severity is HIGH OR CRITICAL) |
| 4 | Then — Deny EPM Application and Admin Requests for Compromised User |
3.1 Create the Flow
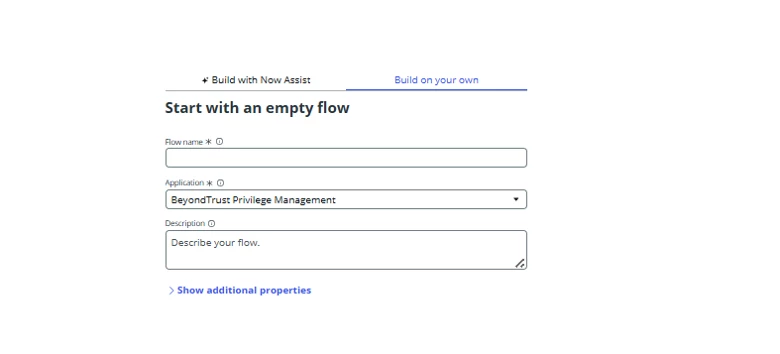
Step 1: In Flow Designer, click New > Flow.

Step 2: Set the following properties:
| Flow Name | Deny EPM JIT App Request Based on Tenable Scores |
| Application | Security Incident Response |
| Description | Triggers on BeyondTrust EPM JIT incident creation, retrieves Tenable CVE data, writes to work notes, and denies the EPM request if severity is HIGH or CRITICAL. |
| Run As | System User |
Step 3: Click Submit.
3.2 Configure the Trigger
Step 1: In the flow canvas, click Add a Trigger.
Step 2: Select Record > Created.
Step 3: Configure the trigger:
| Table | Incident [incident] |
| Condition field | Short description |
| Operator | contains |
| Value | BeyondTrust EPM JIT |
Note: This condition ensures the flow only fires on BeyondTrust EPM JIT incidents — not every incident in the system. This prevents unnecessary Tenable API calls.

Step 4: Click Done.
3.3 Add Step 1 — Get Tenable Vulnerabilities and Scores
Step 1: Click the + icon below the trigger.
Step 2: Select Action.
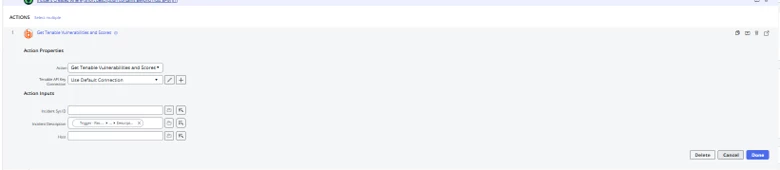
Step 3: Search for and select "Get Tenable Vulnerabilities and Scores".
Step 4: Map the action input:
| Incident Description | Trigger > Incident Record > Description |
Note: The Description field contains the full BeyondTrust request string including the Windows file path (e.g., c:\windows\system32\mmc.exe). The action extracts the filename automatically.
Step 5: Click Done.
3.4 Add Step 2 — Write CVE Results to Work Notes
Step 1: Click + below Step 1.
Step 2: Select Action.
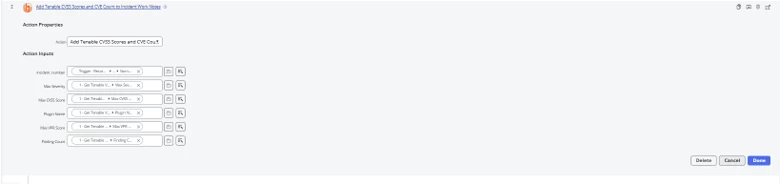
Step 3: Search for and select "Add Tenable CVSS Scores and CVE Count to Incident Work Notes".
Step 4: Map the action inputs:
| Incident Number | Trigger > Incident Record > Number |
| Finding Count | Step 1 (Get Tenable Vulnerabilities and Scores) > Finding Count |
| Max Severity | Step 1 (Get Tenable Vulnerabilities and Scores) > Max Severity |
| Max CVSS Score | Step 1 (Get Tenable Vulnerabilities and Scores) > Max CVSS Score |
| Max VPR Score | Step 1 (Get Tenable Vulnerabilities and Scores) > Max VPR Score |
| Plugin Name | Step 1 (Get Tenable Vulnerabilities and Scores) > Plugin Name |
Step 5: Click Done.
3.5 Add Step 3 — If Condition (Risk Score Criteria)
Step 1: Click + below Step 2.
Step 2: Select Flow Logic > If.
Step 3: Set the Condition Label to: Risk Score Criteria
Step 4: Add the following conditions:
| Condition 1 | Step 1 (Get Tenable Vulnerabilities and Scores) > Max Severity is HIGH |
| OR |
|
| Condition 2 | Step 1 (Get Tenable Vulnerabilities and Scores) > Max Severity is CRITICAL |
Note: Use the OR logic between conditions so that either HIGH or CRITICAL severity triggers the denial. Both conditions reference the Max Severity output from Step 1.

Step 5: Click Done.
3.6 Add Step 4 — Deny EPM Request (Then branch)
Step 1: Inside the "then" branch of the If condition, click the + icon.
Step 2: Select Action.
Step 3: Search for and select "Deny EPM Application and Admin Requests for Compromised User".
Step 4: Map the action input:
| trackingRecord | Trigger > Record Created > Incident Record > Number |
Note: The trackingRecord input links the denial action back to the originating incident. Map it from the trigger's Incident Record Number — not sys_id.

Step 5: Click Done.
3.7 Save and Activate
Step 1: Click Save in the top-right corner.
Step 2: Click Activate. The flow will now run automatically on every new BeyondTrust EPM JIT incident.